
How to Inspect, Repair and Maintain Vinyl Siding

Vinyl siding is one of the lowest maintenance cladding products available on the market today. Over the last few decades, manufacturers have been increasingly producing vinyl to strict standards, protecting against fading, cracking, blow offs in extreme winds, and more.
One weakness of vinyl siding is the hollow void created between the siding panel and the wall. This gap leaves the siding susceptible to impact damage from flying objects such as hail or a rock thrown from a lawnmower.
This risk of damage is reduced when using insulated vinyl siding, which features a contoured foam backer that acts as a shock absorber against impact.
In the event your home is clad with standard vinyl siding and has experienced some kind of damage, you will want to repair it right away to prevent any water infiltration or other elements from damaging the wall behind the siding.
There are a few options when repairing vinyl siding, although it’s important to check with the manufacturer or your particular brand to make sure you don’t void the product warranty.
Tools Needed to Repair Vinyl Siding
Depending on your approach to repairing vinyl siding, some tools you may need are:
- Hammer
- Tape Measure
- Level
- Utility Knife
- Tin Snips
- Zip Lock (unlocking) Tool
- Caulk & Gun
- Riveter
- Ladder
Inspect Damaged Vinyl Siding
Begin your inspection from the ground by walking around the house. Since there is a lot of siding on a home, we recommend taking a pen and pad of paper with you to log any type of damage you may encounter, and its location.
Popular types of damage you might see are dented or cracked panels, loose or missing panels, and faded or otherwise discolored panels. There are three areas of a vinyl sided home that are generally prone to damage: The base of the wall where the first few panels are, the corners, and the tops of the wall.
The base of the wall is susceptible to damage because it is the lowest to the ground and encounters the most traffic. Objects like a rock thrown from a lawnmower or trash cans stored against the house can strike unsupported siding that’s lowest to the ground and cause visible impact damage.
Vinyl corner posts that are not filled with insulation also create a large gap which can be susceptible to impact damage. This gap can also serve as a place for birds, bees, or other pests to nest.
Vinyl siding in hard to reach areas at the top of the wall can be susceptible to tear offs or other damage if the panels were not properly installed.
Repair Vinyl Siding
Caulk or Patch Small Holes in Siding
If the hole is small enough, you may be able to fill it in by applying a generous amount of exterior caulk to the hole with a caulk gun, then scrape off the excess once it dries.
Make sure the caulk matches the color of the vinyl siding as close as possible. If you cannot find caulk that closely matches, you can paint the dried caulk with acrylic latex paint for exterior use that is colored to match your siding. There are also patches and stickers available that can be easily applied over the hole.
Replace a Damaged Vinyl Siding Panel
The best option when repairing vinyl siding is to replace the damaged panel. Below are the Vinyl Siding Institute’s instructions for replacing a panel.
- Slip the zip lock or unlocking tool behind the bottom of the panel above the one to be replaced. Unzip it from the lock and the damaged panel (Fig .76)
- Gently bend out the upper panel. Take the nails out of the damaged panel and remove it (Fig. 78).
- Lock the new panel and nail it up (Fig. 78).
- Use the unlocking tool again to zip the upper panel over the lock on the new panel (Fig. 79).

Repair a Damaged Vinyl Siding Corner Post
Another area of vinyl siding that can be susceptible to damage is the corner post. By using an insulating corner post insert, you can completely fill the gap behind the corner post and protect it from impact damage. Learn more about corner post inserts here>
Below are the steps to repair a damaged vinyl siding corner post.
- Cut away the face of the damaged corner, leaving the nail hem and pocket intact.
- Remove the nailing hem from the replacement corner (Fig. 80).
- Place the new corner over the remaining portions of the old one and fasten it into position with one rivet on either side located at the top of another post.

Standard Vinyl Siding Maintenance
Vinyl siding is the lowest maintenance siding product available on the market today. It requires no painting, staining, sealing, or caulking to maintain it’s like-new appearance. Occasionally wash vinyl siding with mild soap and a garden hose as needed.

Other Related Topics


Pros Who Know:
Trimming a Window
Definition of Fiber Cement Siding (in Under 100 Words)

Noun: Fiber cement siding is an exterior cladding for homes and commercial buildings, made from cement and with cellulose fibers.
Fiber cement siding is an exterior cladding for homes and commercial buildings. Made from cement and with cellulose fibers, it is available in planks, shingles, and flat boards. It comes pre-painted or pre-stained, and can be painted any desired color.
Fiber cement siding is heavy and fragile before installation, requiring two people to install it. Silica dust generated by cutting fiber cement can lead to silicosis and other lung diseases. Special equipment is required during installation to mitigate prolonged exposure.
Fiber cement is non-combustible and widely used in areas prone to wildfires.

Definition of XPS (in Under 100 Words)

Noun: XPS, or extruded polystyrene, is closed cell insulation commonly used in remodeling and new construction applications.
XPS (extruded polystyrene) is closed cell insulation used in remodeling and new construction. XPS is typically available in flat, rectangular boards due to limitations in the manufacturing process.
XPS provides increased rigidity, making it suitable for use on roofs, below grade, below slab, and other applications.
Popular brands of XPS insulation are recognizable by their color: blue from Dow, pink from Owens Corning, green from Kingspan, etc.
How to Trim a Window for Insulated Vinyl Siding

In this article we’ll explain the three major steps to trim out a window for insulated vinyl siding. These are our recommendations for the best finished appearance, although there are many methods to install trim around a window.
Trimming out windows and doors is one of the most important steps when installing new siding on a home. A well done trim installation can set up the rest of the project for success, and dramatically improve the overall appearance of the home.
Installing insulated vinyl siding is very similar to installing traditional vinyl siding. The additional thickness of the insulation adhered to the siding does require some additional steps when trimming out windows, doors, and other openings. Read more about vinyl siding vs. insulated vinyl siding here.
We highly suggest watching the video below, which supplements the written instructions.
Trimming a Window for Insulated Vinyl Siding: Tools and Materials
- Aluminum coil
- Aluminum break
- Snips
- Speed Square
- Hammer
- Nails
- Carpenters pencil
Step 1: Select Your J-Channel

When installing traditional vinyl siding, the standard j-channel ranges from ⅝” to ⅞” wide. When installing insulated vinyl siding, you must use a wider j-channel, ranging from 1-⅛” to 1-½” wide, made specifically for receiving the additional thickness of the insulation.
If you are installing a product like FullbackV, where the contoured insulation is separate from the vinyl panel, you can use a standard j-channel with some simple modifications, which we will outline later in this article. (Butt the Fullback insulation against the foam shim, then slide the siding over top, into the pocket of the j-channel. Using a foam shim maintains continuous insulation.)
Once you have your j-channel selected, push it against the edge of the window. If the channel sticks out past the widow, you will want to install a wood frame made of 2x4s around the window to build it out. Begin by installing housewrap and a drip cap at the top of the window. Frame the window with 2x4s, tapering the bottom edge to ensure any collected water can drain away from the window.
You are now ready to install the aluminum coil cap.
Step 2: Trim Windows with Coil

Measure the width and height of the 2x4 frame, then cut pieces of coil to the following lengths:
- 1 pc - 2” longer than the width of the frame top
- 2 pc - 1” longer than the height of the frame side
- 1 pc - Exact width of the frame bottom
To bend the coil, measure the inside, face, and outside of the wood frame. Use an aluminum coil brake to bend the coil to match the shape of the wood frame. Your first bend will be the inside measurement, the second bend will be the face measurement, and your third bend will be the outside measurement.
Now that you have four pieces of bent coil, you must make some cuts using snips to ensure they will fit together appropriately at the corners.
You will need notched corners on both ends of the bottom cap, as well as the tops of the side caps. Make mitered edges on the four remaining corners: the two edges on the top cap, and the two bottom edges on the side caps.
For a Notched Corner:
Start by laying the bottom cap flush against the edge of the wood frame. Mark the inside of the window, and one inch past that mark. Cut all the way to the first mark and remove the extra material, then cut to the second mark, then bend to create a tab. Repeat for the other required notched corners.
For a Mitered Corner
Lay the cap against the window frame. Mark the inside corner of the window, then draw a 45 degree angle. Leave a one inch tab at the bottom, and cut away the remaining material. Place the cap on the window, then fold the tab downward. Repeat for the other required mitered corners.
At this point, you’re ready to flash the window according to your local building codes.
Step 3: Installing J-channel

Whether you decided to build out and cap the window or not, the steps for installing j-channel around a window are the same.
Measure the width and height of the full window, then cut pieces of j-channel to the following lengths:
- 1 pc - 2” longer than the width of the frame bottom
- 2 pc - 3” longer than the height of the frame side
- 1 pc - 4” longer than the width of the frame top
You will need to create notched corners on both ends of the bottom j-channel, and at the tops of the side j-channel. You will need mitered corners on the four remaining ends (the two edges on the top j-channel, and the two bottom edges on the side j-channels).
For notched corners, remove material equal to the width of the j-channel face. For mitered corners, mark the inside corner of the window, and cut a 45 degree angle.
Insert the tab from the mitered corner into the notched corner. Repeat this for the other side of the j-channel, then add the top piece with two mitered corners.
Finish by appropriately nailing the j-channel into place. Once the windows and doors are trimmed out, and all other accessories are installed, you’re ready to install the siding panels.

Other Related Topics
Pros Who Know:
Trimming a Window
Popular Posts
Neopor Graphite Polystyrene: What It Is and How It Works

At Progressive Foam, we offer insulation products made from both expanded polystyrene (EPS) and graphite polystyrene (GPS), so we field a lot of questions about what Neopor GPS is and how it works. If you’re looking for highly energy-efficient, rigid insulation, Neopor GPS might be perfect for your project.
What is Neopor Graphite Polystyrene?
Neopor Graphite Polystyrene (GPS) is highly efficient, rigid foam insulation used in various remodeling and new construction applications, such as behind new siding, below grade, and below slab. Neopor can provide up to 20% more energy savings than traditional white expanded polystyrene (EPS) insulation.
How is Neopor Made?
Neopor is patented and manufactured by BASF, the world’s largest chemical company. BASF integrates high-purity graphite particles into polystyrene beads to create the raw material Neopor. This material is then shipped to insulation manufacturers, who convert the graphite material into rigid boards that are dark gray in color and provide significantly improved energy efficiency.
To convert Neopor into rigid insulation boards, the graphite beads are injected into a mold then hit with steam, which causes them to expand until they fill the mold. Depending on the shape of the mold, the pieces are either ejected from the mold and packaged, or cut to their finished shape with hot wires. For an inside look into the manufacturing process, check out the video below>
How Does Neopor Insulation Work?
Neopor works in the very same way as traditional insulation, with one primary difference - the high-purity graphite particles give the insulation a reflective property which increases the energy efficiency of the material.
Warm air is always trying to move towards cold air, whether that’s the hot air outside during the summer, or the comfortable heated air indoors during the winter. This heat transfer occurs through the walls of the home due to a process called thermal bridging. Click here for more information on the transfer of heat through thermal bridging>
Rigid insulation products trap air inside their structure. This is why large boards of insulation feel extremely light considering their size. Trapped air is a poor conductor of heat, gives the insulation its energy-efficient property. While traditional insulation slows down the transfer, heat still finds the most direct way through the insulation.
The graphite component of Neopor causes the heat to be reflected hundreds of times as it moves through the insulation. This significantly slows the transfer of heat, making Neopor more energy efficient than traditional EPS insulation.


Imagine that heat is a person walking on a path. A path which takes many twists and turns along the way will take longer than a straight path to the destination. That’s how Neopor works; when insulating, we want to slow the transfer of heat as much as possible for maximum energy efficiency.

Neopor Graphite Polystyrene vs. Extruded Polystyrene
On a cost per r-value basis, Neopor is typically a more cost-effective option than extruded polystyrene (XPS) insulation, providing the same r-value for a lower price.
In addition, Neopor features a higher permeability rating. Products with higher perm ratings allow water vapor to pass through the wall, protecting against moisture damage. And unlike XPS products, Neopor can easily be formed into custom shapes during the manufacturing products, for added features and benefits such as increased durability for vinyl siding.
Check out our article EPS vs. XPS vs. GPS for more information>
Other Related Topics
Pros Who Know:
Trimming a Window
The Right Way Topics
Does Insulated Vinyl Siding Reduce Noise?

As the inventors of insulated vinyl siding, we have received hundreds of testimonials from customers over the years claiming that insulated vinyl siding made their homes quieter than before the siding was installed. Whether the noise was a neighbor’s barking dog, street traffic sounds, or a heavy thunderstorm, wrapping the home in a layer of insulation seemed to dampen noises from the outside. Despite many of these claims, it has been difficult to answer the question "Does insulated vinyl siding reduce noise?", until now. We commissioned a third-party test laboratory to conduct a sound transmission loss test to determine how much insulated vinyl siding products truly reduce noise on exterior wall assemblies.
At a high level, the results obtained through testing confirmed that insulated vinyl siding can reduce noise by up to 39% compared to the base wall tested. This confirmed homeowner claims that having insulated vinyl siding installed made their homes quieter than before. In addition, testing showed that insulated vinyl siding reduces sound transmission 8x more than fiber cement.
About Sound
The range of sounds a human being can hear depends on both the pitch and loudness of the sound. Pitch, whether it is high or low, is measured in Hertz (Hz), and loudness is measured in decibels (dB).
For a person with normal hearing, the human hearing range for pitch starts as low as 20 Hz, while the highest possible frequency heard without discomfort is 20,000 Hz. Our hearing is most sensitive in the 2000-5000 Hz frequency range.
In terms of loudness of sound, humans can typically hear 0 dB, while sounds that are more than 85 dB can be dangerous in the case of prolonged exposure. Table 1 shows some common sources of noise and their pitch in Hertz, as well as their loudness in decibels.

About the Sound Transmission Test
Sound transmission loss as defined ASTM C634 refers to “the response of specimens exposed to a diffuse incident sound field, and this is the test method condition approached by this laboratory test method. The test results are therefore most directly relevant to the performance of similar specimens exposed to similar sound fields. They provide a useful measure of performance for the variety of sound field sto which a partition or element may typically be exposed.
A wall assembly specimen was constructed in the laboratory. Sound transmission loss test was initially performed on a filler wall. The 96” wide by 96” high specimen plug was removed from the filler wall assembly. The specimen was then placed on an isolation pad in the test opening.
Duct seal was used to seal the perimeter of the specimen to test the opening on both sides. The interior side of the specimen, when installed, was approximately 1/4” from being flush with the receive room side of the filler wall. A stethoscope was used to check for any abnormal air leaks around the test specimen prior to testing.
Procedure
The sensitivity of the microphones was checked before measurements were conducted. The transmission loss values were obtained for a single direction of measurement.
Two background noise sound pressure levels and five sound absorption measurements were conducted at each of the five microphone positions.
Two sound pressure level measurements were made simultaneously in receive and source rooms at each of five microphone positions.
The air temperature and relative humidity conditions were monitored and recorded during all measurements.
Test Methods and Standards
Results obtained are tested values and were secured using the designated test method(s):
- ASTM E90-09 (2016) Standard test Method for Laboratory Measurement of Airborne Sound Transmission Loss of Building Partitions and Elements
- ASTM E413-16 Classification for Rating Sound Insulation
- ASTM E1332-16 Standard Classification for Rating Outdoor-Indoor Sound Attenuation
- ASTM E2235-04 (2012) Standard Test Method for Determination of Decay Rates for Use in Sound Insulation Test Methods
Summary of Results
#1: INSULATED VINYL SIDING REDUCES SOUND TRANSMISSION BY UP TO 39%
As the frequency rises, so does the amount of sound transmission loss. Insulated vinyl siding reduces noise best in the 2,000-5,000 Hz range, the humans most sensitive hearing frequency range.

#2 INSULATED VINYL SIDING REDUCES SOUND TRANSMISSION 8X MORE THAN FIBER CEMENT
As evidenced in Table 2, insulated vinyl siding reduces the sound transmission of 5000 Hz (comparable to a plane taking off) by up to 39%, while fiber cement reduces the sound by only 4%. This percentage of transmission loss is over 8x higher for insulated vinyl siding than fiber cement.

About Insulated Siding
Insulated vinyl siding is made of a contoured, rigid foam backer permanently adhered to vinyl siding. This provides a long lasting appearance, energy savings, and significantly improves impact resistance compared to traditional vinyl siding.
For more information, check out our article What Is Insulated Siding? Materials, Pros, Cons, and Installation >

Other Related Topics
Pros Who Know:
Trimming a Window
2018 Energy Tax Credits: Does Insulated Siding Qualify?

2018 Energy Tax Credits: Does Insulated Siding Qualify?
Most federal energy tax credits for energy saving upgrades for residential homes expired at the end of 2016, while some were retroactively made available to purchases through December 31, 2017.
Although there are currently no federal energy tax credit programs for 2018, there are many rebates and incentives available through state and local municipalities, as well as utility companies.
There are some very reputable resources available to help determine which of these incentives your insulated siding upgrade may qualify for. Although there will likely be overlap between some of these sites, it may be worth a few minutes of extra research to make sure you are aware of all available incentives.
Energy Star Rebate Finder

Website: https://www.energystar.gov/rebate-finder
The Energy Star Rebate Finder is a great tool to find product rebates and other special offers available in your area for Energy Star Certified products. Simply enter your zip code for a full list of rebates in your area, which can be filtered by product, including appliances, building products, commercial food service, heating and cooling, lighting and fans, and water heaters.
Department of Energy: Tax Credits, Rebates & Savings Finder

Website: https://www.energy.gov/savings
Similar to the Energy Star finder, simply select your state, enter any applicable keywords, and click “apply” to see the tax credits, rebates, and savings in the Department of Energy’s database. You can further filter by product (heat pumps, building insulation, etc.) and eligibility category (residential, commercial, industrial, etc.).
DSIREUSA.ORG

Website: http://www.dsireusa.org/
DSIREUSA.org has long been a great resource for finding information on thousands of efficiency policies and incentives across the country. Although the federal support which has helped keep the site up to date has been discontinued, the North Carolina Clean Energy Technology Center is making an effort to keep the site free and open as long as possible.
Best Practices for Claiming Your Tax Credit
Depending on the tax credit provided by your state, municipality, or utility company, you will want to carefully follow their instructions for claiming your energy tax credit for insulation. Consider also taking the following steps:
- Request an invoice demonstrating the cost breakout of the insulation component from your contractor. The cost tpyically must exclude the cost of onsite preparation, assembly, original installation labor, siding or sales tax, although it’s a good idea to check. This will help verify the true value of the insulation upgrade, separate from the other products that might be used on your project.
- Download any official certificates from the manufacturer. This will help verify the energy performance of the product and that it qualifies for the credit you’re applying for.
- Retain these documents for your records. You may not be required to provide this documentation to the IRS when filing for your tax credit, but you will be required to present it if audited.
When investing in a home improvement project such as insulated siding, it is great to not only get the energy savings year after year, but also put a few bucks back in your pocket at tax time. If you still have questions about possible tax credits, incentives, and other rebates for energy saving upgrades such as insulated siding, contact us for more information.
Other Related Topics
Pros Who Know:
Trimming a Window
Definition of Thermal Bridging (in Under 100 Words)

Verb: The movement of heat across an object that is more conductive than the materials around it.
Thermal bridging is the movement of heat across an object that is more conductive than the materials around it. The conductive material creates a path of least resistance for heat.
Thermal bridging across wooden studs in a wall is a major source of energy loss in homes and buildings. This thermal bridge can lead to higher utility bills. To combat the problem of thermal bridging in traditional homes, cover the studs with continuous insulation.
3 Ways to Insulate Siding and Reduce Home Energy Loss

3 Ways to Insulate Siding and Reduce Home Energy Loss
There is no better time to add insulation to the walls of an existing home than when new siding is installed. The old siding will either be removed or covered up in the process, making it easy to add insulation a number of ways. Alternatively, adding insulation to the walls can also be done from the inside, which requires the removal of drywall and can be more difficult and expensive than it’s worth. This article discusses three ways you can insulate siding and reduce home energy loss.
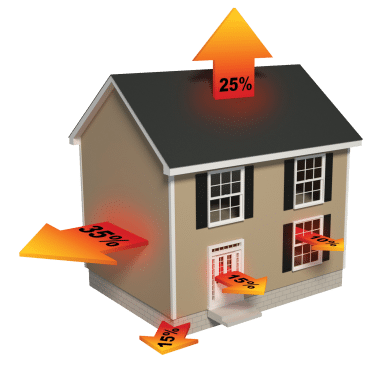
Walls account for 35% of energy loss in a home, more than any other component, including the roof, windows, and doors. This makes the walls a great place to start when improving the energy efficiency of a home. Even the United States Department of Energy (DOE) agrees that “when new siding is to be installed, it is a good idea to consider adding insulation under new siding.”
There are three primary ways to add insulation to a home when siding is installed:
-
Blow insulation into the cavity
-
Add flat rigid insulation to the wall before the siding is installed
-
Install insulated vinyl siding
Luckily, if high levels of energy savings is your goal, any combination of these solutions can be used to increase energy efficiency. It’s important to understand how various insulation products work so you can determine which solution, or solutions, are right for your particular project.
How Does Insulation Work?
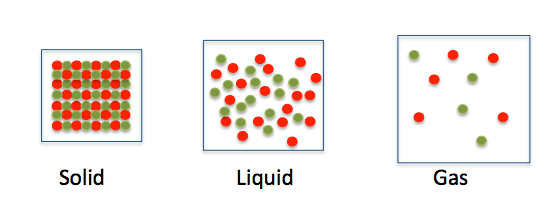
The type of energy loss you are reducing by adding insulation to the wall of a home is conduction, a process where heat is transferred from one atom to another by direct contact. Solids, liquids, and gases can all transfer heat through conduction, although solids transfer energy most efficiently because the molecules are most tightly packed.
Insulation products work because they are mostly made up of trapped air. Because the molecules of air (gas) are less dense, insulation does not transfer heat quickly through conduction, making it more energy efficient than other materials.
Source: https://study.com/academy/lesson/what-is-conduction-in-science-definition-examples.html
Think about any insulation products you have seen. Large boards of rigid insulation are generally very light and easy to carry, because they are mostly made of air. Fiberglass batt insulation is also lightweight and compresses when pressed, indicating there is a lot of air in between the fiberglass material.
Blown-In Insulation
When new siding is installed, the old siding can be left in place, or torn off before the new siding is installed. In either case, a qualified installer can blow loose fill insulation, typically either cellulose or fiberglass, into each cavity.
Installers start by puncturing holes in the side of the house between each stud, at the top of the wall. They then insert a tube into each hole that will blow the insulation into the wall, which will fill the cavity. The holes are then plugged before new siding is installed.
This is a great option for homes that don’t have cavity insulation, or insulation that has settled in the wall over time, but it does not stop energy loss due to thermal bridging through the studs.
Blown in insulation can be added to a wall without installing new siding. However, from the exterior it creates large, unsightly holes that must be plugged, sanded, and painted to try and match the rest of the siding. Blown in insulation can also be installed from the interior, but similar holes made in the drywall must be plugged, patched, sanded, and painted.
Source: https://www.fieldsservice.com/webapp/p/539/furnace-and-air-conditioning-repair-in-nazareth-pa?page=4
Flat Board Insulation

Continuous insulation under new siding has become a popular way to improve energy efficiency on an existing home because it addresses a problem known as thermal bridging.
Most homes in the United States are built with traditional wood frame construction, with studs every 16” on center. Even if a home has insulation in the cavity, heat can bypass that insulation and transfer through the wall across the wood studs.
Nearly 25% of a home’s wall is made up of these studs that typically aren’t covered in insulation. That’s like having one entire wall of a home with no insulation.
By adding a continuous layer of insulation under new siding, you are able to wrap the home in a complete blanket of energy savings. In addition, flat foam insulations can help level out inconsistencies in the wall for a more perfect siding appearance.
The most popular flat foam insulation products used in remodeling are made of expanded polystyrene (EPS), extruded polystyrene (XPS), and graphite polystyrene (GPS). You can learn more about these insulation types here. Thicker products provide more insulating value and typically come in 4’x8’ sheets. Thinner products traditionally come in 4’x50’ fanfolded bundles. (insert pictures of insulated sheathing and fanfold)
Insulated Vinyl Siding
Another option for adding insulation to the walls of a home is to use insulated vinyl siding. Although using flat insulation with traditional siding can be a cheaper alternative, it doesn’t come with all the additional benefits that insulated vinyl siding can provide.
Similar to blown in insulation, insulated vinyl siding provides r-value for improved energy efficiency. And just like flat insulating sheathings and fanfolds, insulated siding also levels the wall for a better looking siding job. But insulated vinyl siding has one unique feature: contoured insulation that is permanently adhered to vinyl siding.
Contoured insulation not only insulates the home, but also provides support to the siding panel, helping to maintain the “just installed” look for years to come. The foam backer also acts as a shock absorber for the siding, significantly improving impact resistance and protecting it from impact damage from things like hail, baseballs, and rocks thrown from the lawnmower. Learn more about insulated vinyl siding and it it's right for you.
Summary
If you’re looking to improve the energy efficiency of an existing home, there are many ways to add insulation to the walls. Blown in, flat foam insulation, and insulated vinyl siding are all popular ways to improve energy efficiency.
Depending on the scope of your project, your budget, and how much energy savings you’re aiming for, all three of these solutions can be used on their own or in combination with each other to meet your energy savings needs.
Insulated Vinyl Siding: Does it Really Work?

Insulated Vinyl Siding: Does It Really Work?
A deeper look at energy savings, moisture management, and durability
Insulated vinyl siding has been around since the mid-1990’s and has been installed on over half a million homes. Despite this track record, many people are not familiar with what insulated vinyl siding is, how it works, and if it’s the right siding product for them. When they take to the internet for research, they may run into exaggerated claims or inaccurate opinions about the product. Which brings us to the question does it really work?
As the inventors of insulated vinyl siding, it’s our responsibility to accurately represent the facts, pros, and cons of the product so you can determine if it’s right for your unique project.
In this article, we will address three primary areas of questioned performance:
- energy savings
- moisture management
- and durability
Energy Savings with Insulated Vinyl Siding
Why Is Insulation Necessary Under New Siding?

The United States Department of Energy (DOE) says “when new siding is to be installed, it is a good idea to consider adding insulation under new siding.” Continuous insulation has become a popular recommendation to help reduce energy loss.
There may be an invisible energy leak in your walls that is costing you money every day. The source is the wooden studs in the wall. Although there may be pink batt insulation in between, the studs themselves are not insulated. Energy transfers across these studs from the warm interior of the home to the cold exterior (or vice versa in the summer) through a process called thermal bridging. And because studs make up 25% of a home’s wall space, it’s like having one entire wall of the home without insulation.
Even though you may have R-19 pink insulation in the cavity, this is only the “nominal r-value,” a rating provided by the manufacturer. “Effective r-values” are actual thermal resistances provided by the insulation in an actual assembly, accounting for any losses attributed to thermal bridging.(1)
Adding continuous insulation to the outside of the home when new siding is installed covers those studs in an energy-saving blanket of insulation, helping to stop thermal bridging and reduce energy loss.
What is the Effective Energy Savings of Insulated Siding?
Many insulated siding panels provide r-values of 2.0 - 3.5, comparable to the most commonly used flat foam insulation options.
As new building and insulation materials have entered the market, confusion over the nature and meaning of "R"-value has raised questions among building professionals and consumers alike. What exactly is "R"-value? Is it an effective and objective measure of the thermal performance of an insulation product or construction system?
The published r-value of insulated vinyl siding is true effective r-value. Even though there are seams between the panels of siding, the r-values are tested in an as-installed state using a hot box apparatus test.
This procedure ensures that the R-value claimed for an insulated siding product represents the actual thermal insulation value that will be delivered to the home.
When considering insulated siding for a home renovation project, most people ask, “How much will it reduce my energy bills?”
Third party energy modeling has shown that insulated siding can reduce heating and cooling costs by up to 16%, depending on your home style and climate zone. Because every home is different, as well as the behaviors of its inhabitants, it is impossible to accurately estimate potential energy savings without doing appropriate blower door testing on the home.
Managing Moisture with Insulated Siding

In the past, we have been asked, “does insulated vinyl siding absorb moisture?” Insulated vinyl siding does not absorb or hold moisture, or contribute to mold or mildew growth in any way. In fact, third-party testing that proves insulated vinyl siding is a great exterior cladding option for managing moisture in a home.
Craig Drumheller, Senior Energy Engineer with Home Innovations Research Labs (HIRL), completed a one-year field study titled Effect of Cladding Systems on Moisture Performance of Wood-Framed Walls in a Mixed-Humid Climate.
In this study, Drumheller compared insulated siding with eight other wall assemblies, including traditional vinyl and fiber cement sidings, and concluded that “Insulated vinyl siding demonstrated the best moisture performance in the study, with the overall driest wall assembly regardless of indoor moisture conditions.”
The thermal resistance of insulated siding provides a double benefit: reduced heat flow in the wall assembly, thereby saving energy, and a higher wall cavity temperature, resulting in increased drying capacity.
In addition, a technical bulletin published by the EPS Molders Association highlighted third-party testing conducted by SGS US Testing Company Inc. to evaluate EPS’ resistance to fungi and mold growth. Using ASTM C1338-08 Standard Test Method for Determining Fungi Resistance of Insulation Materials and Facings, the research indicates that under a 28-day incubation period, the EPS had no trace of mold growth. EPS insulation is a closed-cell foam, and exposure to moisture has little, if any, effect on its thermal performance and dimensional stability.
Does Insulated Vinyl Siding Actually Improve Durability?
Increased durability is one of the most unique benefits of insulated vinyl siding. Although you can insulate a home with blown in for flat foam insulation, the contoured insulation of insulated siding provides support to the siding panel for ultimate durability.
Most siding products are made with one primary goal in mind - to make a home look great - but they aren’t all designed to protect the house. For instance, traditional vinyl siding creates a hollow void between the back of the siding and the wall. This leaves the siding susceptible to damage from impact due to hail, baseballs, rocks thrown from the lawnmower, creating a compromised exterior that no longer looks beautiful.
Insulated vinyl siding has contoured foam that acts as a shock absorber for the siding, protecting it from impact and preserving the appearance.
Check out these impact videos that push insulated vinyl siding to the limits of durability:
Summary
In summary, insulated vinyl siding is an effective way to insulate a home when adding new siding. Although comparable energy savings can be achieved with cheaper alternatives such as foam board insulation, these flat alternatives do not provide additional benefits such as maximum moisture management and superior durability.
It is important to determine the goals of your project when considering insulated siding. If you want maximum energy savings, combining options such as flat foam insulation under insulated vinyl siding could provide high r-values with all the additional benefits of contoured insulation.
Other Related Topics
Pros Who Know:
Trimming a Window