
Definition of EPS Foam (in Under 100 Words)

Noun: A closed cell foam made of 98% air and 2% plastic, used in insulation and packaging applications
EPS (Expanded Polystyrene) is a closed cell foam that has been around since the 1950’s. EPS is 98% trapped air and only 2% plastic, making it an efficient insulator with a small amount of raw material.
EPS foam is very versatile because it can be formed into different shapes. It is typically more cost-effective than other comparable products. It is also completely recyclable.
Common applications for EPS include insulation for construction projects, electronics and food service packaging, and more.

Vinyl Siding Profiles: A Complete Design Guide

Vinyl Siding Profiles: A Design Guide
Vinyl siding comes in many shapes, sizes, and colors to help you design the perfect look for your project. It is one of the most versatile siding products on the market today. Keep in mind that most vinyl siding profiles are intended to emulate the look of traditional wood siding products. Depending on your part of the country, some profiles may be more popular than others in your area.
For instance, you may see a lot of shake and shingle siding in New England, beaded vinyl in the South, and vertical siding profiles in the West and Midwest. Of course, no design is exclusive to a geography, and mixing of materials and profiles across the United States has become extremely popular.
If you’re new to the world of siding, or are just looking for some design inspiration, this guide will provide important characteristics of each vinyl siding profile available today. We will cover:
Vinyl Siding Profiles
- Clapboard
- Dutchlap
- Beaded
- Vertical
- Shake Vinyl Siding
- Shingle and Scallop Vinyl Siding
- Log Siding
Vinyl Siding Profiles
Clapboard Vinyl Siding

Clapboard profiles are very similar to traditional wood siding, featuring straight faces and crisp edges. The clapboard profile supposedly originated when Native Americans shaped timber from the land which they built their dwellings on.
You may hear clapboard siding referred to as single 6”, double 4”, triple 3”, and other profiles. Single, double, or triple refers to the number of courses, or rows, per panel of siding. The number refers to the height of each course.
For instance, a double 6 clapboard vinyl siding is two courses high, with each course measuring 6” tall. Below is a list of popular Clapboard profiles:

Photo Credit: Vinyl Siding Institute
Dutchlap Vinyl Siding

The dutchlap siding profile originated in northern Europe, although it was made popular in the Mid-Atlantic region of the United States during the days of early settlers.
This profile is a popular alternative to clapboard, featuring strong shadow lines created by the curve at the top of each course.
Similar to clapboard, dutchlap vinyl siding is categorized by how many courses on a panel, and the height of those courses. Below are popular profiles of dutchlap vinyl siding.

Photo Credit: Vinyl Siding Institute
Beaded Vinyl Siding

Beaded vinyl siding is similar to the clapboard profile, but it features an additional rounded bead at the bottom of each course. This bead enhances the shadow line created by each course, and originated in the southern United States. This profile was popular on buildings constructed in the south prior to 1800, and maintains its popularity in the region today.
The most popular profiles of beaded vinyl siding are single 6”, single 6.5”, and single 7”.
Vertical Vinyl Siding

Vertical vinyl siding, also referred to as board and batten, has been one of the fastest growing profiles in the United States in recent years. Vertical siding designs date back to medieval times, and were deep rooted in the design traditions of the Midwest, mountain regions, and West Coast of the U.S.
Vertical siding alternates wide and narrow panels, the wide portion being the “board” and the narrow portion being the “batten”. Although generally used as a accent, vertical siding can be used in whole house applications.
The most popular vertical siding profiles are board and batten 6”, 7”, and 8”.
Shake Vinyl Siding

Originating in the Northwest and East coasts of the United States, hand split cedar shakes were used to protect early homes from the harsh environment of the seaboard. Today, shakes are used to achieve a natural look, and have become very popular in accents on gables and other sections of the home, or as a whole house application.
Using vinyl siding shakes provides the same rugged beauty of hand-cut cedar shakes, without the ongoing maintenance hassles. Shake siding typically features two types of edges: staggered, which has varying lengths to create a more rustic look, or straight, with all shakes being one length for a more crisp appearance.
Popular profiles of shake siding are:

Photo Credit: Vinyl Siding Institute
Shingle Vinyl Siding

Various profiles of shingle siding gained popularity in the northeastern United States during the late 19th century. Shingles come in a wide range of profiles, and are typically used as accents in gables or dormers.
The name of the shingle profile typically refers to the shape that it emulates. Rounded scallops, hexagon, octagon, fish scale, and mitered corner are all popular shingle vinyl siding profiles.
Log Siding

Vinyl siding has been made to emulate many different profiles of wood siding, so why not the rustic log cabin as well? Although a less popular option than dutchlap or clapboard, log shaped vinyl siding has been used in many applications where true log cabin construction is not feasible, but the appearance is desired.
Popular Home Designs & the Siding Profiles Used
You may be confident in selecting the right profile of vinyl siding for your project, or you may be looking for some inspiration. Below are some samples of home styles, and the profiles that are used to create the desired appearance.

Craftsman

Most Popular Profiles: Dutchlap, clapboard, vertical siding (board and batten), shake
Accents: Shingles, shake
Cape Cod

Most Popular Profiles: Clapboard and shake
Accents: Scallops
French Colonial

Most Popular Profiles: Dutchlap and Clapboard, sometimes shake
Georgian

Most Popular Profiles: Clapboard and beaded
Federal / Adam

Most Popular Profiles: Clapboard, beaded, shake
Greek Revival

Most Popular Profiles: Clapboard
Italianate

Most Popular Profiles: Clapboard
Accents: Beaded soffit
Queen Anne

Most Popular Profiles: Clapboard and shingle
Accents: Half rounds, shingle, vertical siding (board and batten)
Folk Victorian

Most Popular Profiles: Clapboard
Accents: Shingle, half rounds, fish scale, scallops
Aside from the primary and accent siding profiles, the accessories you choose will have a huge impact on the overall appearance of the home. There is an extensive list of accessories available on the market today to create a unique design.
What’s New With PFT: StayDry Technology
Thanks to new advancements in our manufacturing process, our Premium Series ProFold and Proboard Insulating Sheathing are now breathable! Whether you’re a new user of our products, or have been installing them for years, this new product feature can be used immediately to differentiate your business.
In recent years, moisture management has become a very hot topic among the building science community. Moisture trapped in the walls of a home can generate mold and mildew, leading to problems such as compromised structural integrity of the home, or medical conditions for the building’s inhabitants.
The average family of four generates 4-6 gallons of water daily through basic activities like cooking, bathing, and even breathing. Adding insulation to a home tightens the building envelope to reduce energy loss and lower utility bills, but can also create potential moisture problems if that moisture can’t escape through the walls.
Our insulation products that have been around for over 20 years, such as insulated vinyl siding, and have always helped protect against moisture concerns with sufficient breathability. However, traditional fanfold and sheathing products on the market, made of XPS or EPS with film facers, are not breathable.
Luckily, that has changed! ProFold Premium and ProBoard Premium are now made with StayDry Technology, a proprietary manufacturing process that makes the insulation three times more breathable than those comparable products. With a perm rating up to 2.5, these flat foam products can help protect the home from potential moisture damage by letting water vapor generated inside the home to escape.
We’ve created a simple tool to help demonstrate the difference in breathability between our premium series products and traditional XPS insulation. On one side, we have a piece of ProBoard Premium, sealed around the edges, with water sitting on top. On the other side is a piece of XPS, sealed the same way. As I force air into the chamber with ProBoard, you can see bubbles are generated in the water, showing that it is breathable while still providing insulation value. On the XPS side, air being forced into the chamber cannot make it’s way through the foam; although it also provides insulation value, it is not as breathable.
You can have the confidence knowing that you will have a complete breathability story with our ProFold Premium and Proboard premium, no matter where they fall in your product offering!

Product Downloads
ProFold Premium Brochure (pdf 1.39 MB)
ProFold Premium Data Sheet (pdf 0.09 MB)
ProBoard Premium Brochure (pdf 1.47 MB)
ProBoard Premium Data Sheet (pdf 0.09 MB)


EPS vs. XPS vs. GPS: The Definitive Comparison Guide

EPS vs. XPS vs. GPS
The goal with insulation is simple: to make a home more comfortable and energy efficient. But with so many products available on the market today, how do you know which one is right for your particular project? This article discusses EPS vs. XPS vs. GPS.
There are many ways to insulate, including rigid foam insulation, spray foam insulation, fiberglass batt insulation, blown in cellulose insulation, and more. Here are the typical applications for each type of insulation:
- Rigid Foam - Outside walls of homes and below grade.
- Spray Foam - Sprayed into the wall cavity, typically in new construction before drywall.
- Fiberglass Batt - Rolled into the wall cavity between studs, typically in new construction.
- Blown In Cellulose - Popular in remodeling projects; holes are cut in the wall to fill the cavity with insulation, or it is sprayed into the attic.
Although adding insulation to a home can reduce sound transmission and create a quieter interior, rigid foam insulation is not intended for sound dampening. Open cell insulation products are better suited for reducing sound transmission, while closed cell insulation is better for providing insulation value. The video below explains the main differences between EPS, XPS and GPS.
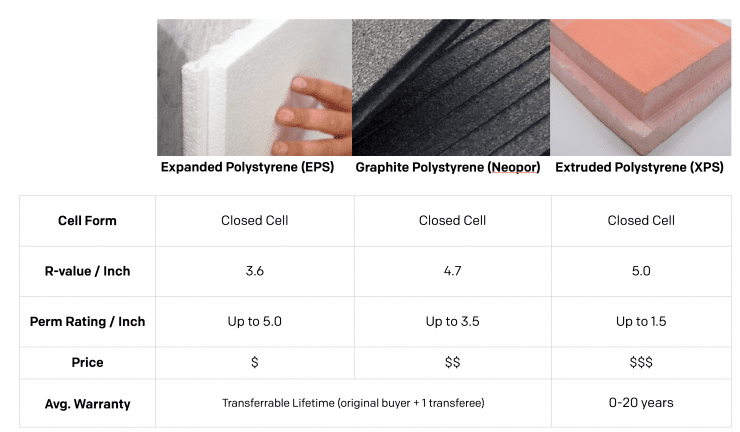
In this article we’ll focus on rigid foam insulation for use inside wall applications, comparing three popular types:
- Expanded Polystyrene (EPS)
- Extruded Polystyrene (XPS)
- Graphite Polystyrene (GPS)
Expanded Polystyrene (EPS) Insulation
What is EPS?
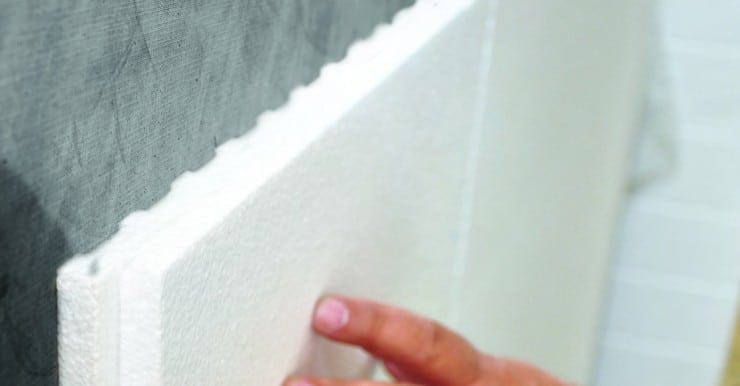
Expanded Polystyrene Insulation, more commonly referred to as EPS, is a closed cell insulation that has been around since the 1950’s. EPS is made of 98% trapped air and only 2% plastic, making it an efficient insulator with a small amount of raw material.
Expanded polystyrene is very versatile because it can be molded and cut into different shapes. The most common shape for remodeling and new construction applications if a flat board, but contoured EPS has also become popular in insulated vinyl siding. The contoured EPS not only serves as insulation, but also provides increased durability and impact resistance to the siding. Click here to learn more about insulated vinyl siding with EPS insulation>
How is EPS Made?
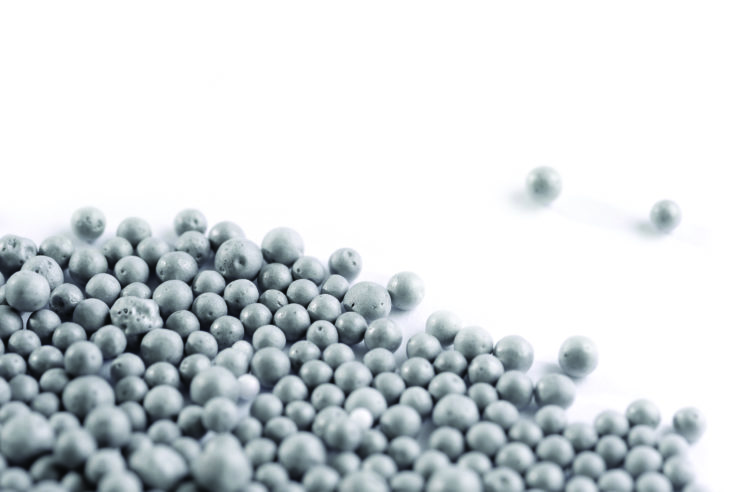
EPS begins as tiny beads of polystyrene, which look like grains of salt. The beads are sent into a mold and expanded many times their original size using steam and pentane until they completely fill the space. Although typically white in color, EPS can feature additives such as colorings or pest deterrents.
If the mold is in the shape of the final product, then the part is removed from the machine and the process is complete. More commonly, beads are molded into a large rectangular block and then cut into the final shape using hot wires.
From there, EPS insulation is then packaged and shipped, or sent through another machine that adheres plastic film facers to the foam. Depending on the particular film used, it can provide enhanced rigidity, reflective properties, printed installation lines and more. Most EPS insulation manufacturers print their brand name and important product information on the film.
What are the key features of EPS?
With any insulation, energy efficiency is the primary feature. Energy efficiency of insulation products are measured in “R-value,” or the resistance to heat flow. The higher the r-value, the higher the insulating capability. EPS insulation features an average r-value of 3.6 per inch. When certain types of plastic facers are applied, the composite product can feature an r-value of up to 3.8 at one inch
In addition to providing energy efficiency, EPS without film facers has a perm rating of up to 5.0. A perm rating is the measure of a product’s ability to let water vapor pass through it.
The average family of four generates 4 to 6 gallons of water vapor inside every day. Products with a higher perm rating allow that vapor to escape to the outside, eliminating potential for moisture damage. Click here to learn more about home breathability and perm ratings>
When it comes to cost, EPS typically has the lowest price tag of the three insulation types outlined in this article.
EPS Data Summary:
- Cell Type: Closed
- R-value: 3.6 per inch, 3.8 with film facers
- Perm Rating: up to 5.0
- Cost: $9 -$13(prices vary based on product specifications)
Extruded Polystyrene (XPS) Insulation

What is XPS?
Expanded Polystyrene, referred to as XPS, is a closed cell insulation product commonly used in remodeling and new construction applications. Due to the manufacturing process, XPS insulation is typically available only in standard dimension square or rectangular boards. Brands of XPS are generally recognizable by the color of the insulation: blue made by Dow, pink made by Owens Corning, green made by Kingspan, etc.
How is XPS Made?
XPS insulation begins as polystyrene crystals, which are combined with special additives and a gas blowing agent. The materials are fed into an extruding machine, where they are blended and melted into a thick liquid. The liquid is processed through a die, expanded into foam, is shaped, cooled, and finally, trimmed.
What are the key features of XPS?
Just like with EPS, energy efficiency is the primary feature of XPS insulation. Due to its physical properties, XPS has a higher r-value than EPS at 4.7 per inch.
In the past, XPS manufacturers were able to claim r-values closer to 5.0 per inch. However, the blowing agents used in the manufacturing process were known to deplete overtime, reducing the insulation value. Manufacturers are now reporting the Long Term Thermal Resistance (LTTR) of their XPS products to account for the reduction in r-value over time.
XPS provides increased stiffness and rigidity, making it suitable for use on roofs, below grade, below slab, and other applications.
XPS Data Summary:
- Cell Type: Closed
- R-value: 4.7 per inch
- Perm Rating: <1.0 up to 1.5
- Cost: $15-$20 per piece (prices vary based on product specifications)
Graphite Polystyrene (GPS) Insulation
What is GPS?
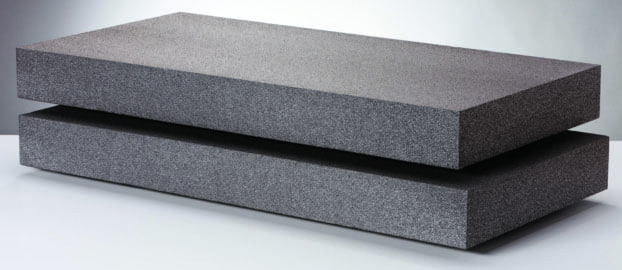
Graphite polystyrene insulation, or GPS, is made from Neopor beads, patented and manufactured by BASF. Neopor gives GPS insulation a dark gray appearance and higher r-value than traditional EPS insulation products. Click here to learn more about Neopor.
Similar to expanded polystyrene, GPS can be formed into many different shapes during the manufacturing process. Although GPS is relatively new in the United States, it has become the leading form of insulation in Europe over the last few decades.
Neopor Graphite Polystyrene: What It Is and How It Works
How is GPS Made?
GPS is manufactured just like EPS insulation. The primary difference is the production of the raw material Neopor. BASF, the world’s largest chemical company, infuses the cell structure with graphite particles, which provide a reflective property and a distinctive dark gray color
Neopor beads are sent into a mold and hit with steam and pentane until they expand to many times their original size and fill the space. Because Neopor is naturally a dark grayish black color, color additives are typically not used.
Once the molding process is complete, the blocks of insulation are then aged and cut into the final shape using hot wires. Plastic film facers can also be adhered to the foam to provide more rigidity, reflective properties, installation guides, and more.
Since the manufacturing process is very similar to EPS, some manufacturers produce both EPS and GPS. This generally requires some additional equipment to avoid cross contamination between the two types of insulation.
What are the key features of GPS?
The key feature of GPS (Neopor) insulation is the r-value of 4.7 per inch, which is achieved thanks to the high purity graphite that is infused in the cell structure of the insulation.
Traditional EPS provides energy savings due to the trapped air pockets in the insulation, which slows down warm air as it moves towards cold air. This is what gives it an energy efficient property.
As radiant heat moves through GPS insulation, it is reflected hundreds of times along the way thanks to the graphite particles, significantly slowing down the transfer of heat and making the insulation more energy efficient. When certain types of plastic facers are applied, the GPS can feature an r-value of up to 4.9 at one inch.
In addition to providing energy efficiency, GPS insulation without film facers has a perm rating of up to 5.0, depending on the density it is manufactured at. A perm rating is the measure of a product’s ability to let water vapor pass through it. Click here to learn more about home breathability>
GPS insulation is more expensive than EPS due to the increased energy savings, but typically less expensive than XPS insulation.
GPS Data Summary:
- Cell Type: Closed
- R-value: 4.7 per inch, 4.9 with film facers
- Perm Rating: up to 5.0
- Cost: $14-$16 per piece (prices vary based on product specifications)
Summary
Depending on your particular application, EPS, XPS, or GPS insulation could be right for your project. Cost, availability, and certain performance features can all impact your decision. Luckily, regardless of which product you choose, adding insulation to a home is always a great investment.
We recommend selecting the product that will provide the most value for your investment. If you’re installing insulation under a new roof or below slab, XPS can be an effective solution. If your insulation needs are for side wall applications before siding is installed, we recommend using a contoured EPS or GPS insulation that not only adds insulation, but also provides durability and lasting support to the siding panel.

How to Install Insulated Vinyl Siding in 9 Steps

As the inventors of insulated vinyl siding, we frequently field questions from contractors and homeowners interested in the details of how to install insulated vinyl siding. Luckily, if you know how to install traditional hollow vinyl siding, you can install insulated vinyl siding.
The majority of the installation steps below are applicable to both vinyl siding and insulated vinyl siding, with a few differences that account for the additional thickness of the installation with the latter.
Tools You Need
- Hammer
- Square
- Chalkline
- Level
- Tape Measure
- Safety Glasses
- Utility Knife
-
Table or radial-arm saw
- Using a saw can help speed up cutting insulated vinyl siding panels and soffit. You must use a fine-tooth plywood blade installed in the reverse direction to appropriately cut the panels.
Take care to saw slowly in extremely cold weather to prevent chipping.
A fine-tooth hand saw can be used as an alternative.
- Using a saw can help speed up cutting insulated vinyl siding panels and soffit. You must use a fine-tooth plywood blade installed in the reverse direction to appropriately cut the panels.
-
Tin Snips
- Good quality snips or compound aviation-type snips will speed the cutting and shaping of the vinyl.
-
Optional Tools to Make the Job Easier
-
- Snap Lock Punch - Used to punch lugs in the cut edges of siding to be used for the finishing course at the top of a wall, or underneath a window.
-
- Nail Hole Slot Punch - Occasionally it may be necessary to elongate a nail hem slot to hit a stud and allow for expansion and contraction.
-
- Zip Lock (Unlocking) Tool - Remove or replace a siding panel by inserting the curved end of the tool under the end of the panel and hook onto the back lip of the buttlock. To disengage the lock, pull down and slide the tool along the length of the panel. Use the same procedure to relock the panel. (would be a good place for a tip of the week video)
The method of installation for insulated vinyl siding is similar for new construction and remodeling. Where there are differences, we have called them out below.
Selecting a Fastener
When installing insulated vinyl siding, use a galvanized, stainless steel, or aluminum nail - something that won’t rust.
Roofing nails with a ⅜” diameter head work well with vinyl siding. The Vinyl Siding Institute recommends using a nail that will penetrate at least 1-¼” into the nailable surface.
With hollow vinyl siding, a 1-½” nail can be used.
Insulated vinyl siding requires at least a 2” nail to accommodate the additional thickness of the insulation. When in doubt, always use a slightly longer nail.
Check your specific insulated vinyl siding manufacturer’s instructions when determining the length required for your particular product.
Terms to Know
There are many terms related to insulated vinyl siding that are important to know during installation. Refer to VSI’s detailed installation guide for a complete list of important terms. Below are just a few:
- Drip Cap / Head Flashing - accessory installed with vertical siding to ensure that water drips away from panels.
- Face - part of the siding that is showing once the panel has been installed.
- Face Nailing - fastening directly onto the face of the siding panel, instead of using a nail hem slot. This practice is generally not used in vinyl siding installation except under special circumstances.
- Flashing - A thin, flat material positioned under/behind j-channels, corner posts, windows, etc. to keep draining water from penetrating the home.
- Fascia - trim covering the ends of the roof rafters.
- Lap - to overlap the ends of two siding panels or accessories to allow for expansion and contraction.
- Miter - to make a diagonal cut, beveled to a specific angle (usually 45 degrees).
- Nail Hem - section of siding or accessory where nail slots are located.
- Weep Holes - openings cut into siding or accessories to allow for water runoff.
9 Steps to Install Insulated Vinyl Siding
Below are 10 steps to install insulated vinyl siding. For a detailed guide, we encourage you to download the complete Vinyl Siding Installation Manual from the Vinyl Siding Institute. Click here to download>
#1: Remove Old Siding (If Necessary)
Depending on your particular project, you may or may not need to remove the old siding before insulated vinyl siding (IVS) is installed.
Traditionally, siding products such as vinyl siding, aluminum, and steel need to be removed. IVS can typically be installed over wood siding as long as it is free from damage and doesn’t create major projections from the wall.
#2: Correct Any Damage to the Wall
Insulated vinyl siding should be installed over a sheathing such as plywood or oriented strand board (OSB) that provides a smooth, flat surface. IVS should never be installed directly to studs without sheathing.
If you find any damage from moisture, pests, impact, or other sources after you have removed the old siding, it will need to be corrected before new siding is installed.
It is typically impossible to correct damage to a wall after siding has been installed, so take advantage of this opportunity to correct any issues beforehand.
Cut out the damaged sheathing and replace with new pieces, secured to the studs per the manufacturer’s instructions.
#3: Add a Weather Resistive Barrier & Flashing
If there is any loose caulk around windows or other openings, scrape it off and re-caulk to protect from moisture penetration.
It is a best practice to install a weather resistive barrier (WRB) such as house wrap to stop the intrusion of bulk water, although not every condition will call for it. Check your local building code requirements for your geographic area.
Code-compliant flashing around all windows, doors, and other openings should be integrated with the water-resistive barrier.
Flashing can also be applied to corners and at the intersection of walls and roofing. Many WRB manufacturers have tapes that can be paired with their house wraps to easily flash these openings.
#4: Install Accessories
Begin with the starter strip, which must be level in order for the siding to be installed perfectly level. Snap a level chalk line at the base of the wall all the way around the house.
Using the chalk line as a guide, install the top edge of the starter strip along the line, securing a nail every 10”. Be sure to leave a space for all corner posts and j-channels. Keep ¼” space between all starter strips to allow for expansion and contraction.
Make sure to use the appropriate starter strip to accommodate the additional thickness of the insulation.
An insulating starter adapter should also be used to appropriate start the first course of siding, provide complete insulation and protection at the base of the wall, where siding is most exposed to sources of impact damage. Check out the video below on using an insulated starter adapter.
Next are the outside and inside corner posts. Place the corner post into position, allowing a ¼” gap between the top of the post and the eave or soffit. Attach with a nail at the top of the highest slot on the post - the post will hang from this nail. The post should extend ¾” below the starter strip. Place all other nails in the center of the slot to allow for expansion and contraction.
When using insulating corner post inserts, it is helpful to cap the bottom of the post to hold the insulation in place. Check out our video detailing this quick trick>
#5: Trim Windows, Doors, and Other Openings
One of the trickier parts of insulated vinyl siding installation is installing j-channel or your preferred trim around all windows, doors, and other openings. Be sure to use the available wider j-channel trim to accommodate the added thickness of the insulation. If you aren’t sure which j-channel is required for your job, check out our video guide to selecting j-channel here>
Once you have selected your j-channel, you must appropriately cut and notch it to fit around all openings The top piece will need to be notched and bent to be provide flashing over the side j-channels. The bottom end of side j-channels will also need to be notched and bent into the bottom j-channel. Our video details how to cut j-channel to appropriately fit around all openings. Watch it here >
In some cases, you may have to build out the window before installing the trim if the insulated vinyl siding is thicker than the window jamb. This can be done in many ways, but a popular method is to surround the window in wood 2x4s, cap it with aluminum coil, then install the j-channel up against it. Watch the video below for full instructions on how to build out a window.
J-Channel must also be installed over roof lines. Keep the j-channel a minimum of ½” from the roofing material. Extend the j-channel past the edge of the roof to ensure proper runoff. If it is necessary to use more than one piece, overlap the j-channel, with the upper piece going over the lower piece to allow for proper drainage.
When installing j-channel under gables, let one of the sections butt into the peak with the other section overlapping. A miter cut can be used here for a better appearance. If more than one piece of j-channel is required, be sure to overlap the channels by ¾”.
Special accessories such as mounting blocks are available for other projections such as water spigots and lights.
#6: Install Insulated Vinyl Siding Panels
The first course of insulated vinyl siding should be placed in the starter strip and securely locked along the entire length of the siding panel before fastening. Nails must be long enough to penetrate into the nailable sheathing a total of 1-¼”. Check out this video on selecting the proper fastener for your job>
Nails should be placed in the middle of nailing slots to allow for expansion and contraction. For this same reason, do not drive the head of the nail tightly against the slot, but rather leave approximately 1/32”, or the thickness of a dime.
When overlapping insulated vinyl siding panels, no gap is needed. Simply butt each piece of foam together.
Once the first course is securely attached, continue up the wall by locking subsequent panels into the previous piece, then nailing to the wall. For best appearance and moisture management, stagger the laps, so no two courses are aligned vertically.
It’s a good idea to check every fifth or sixth course for horizontal alignment with a level. Also, check siding alignment with adjoining walls.
Always overlap joints away from entrances or the greatest point of traffic. This will reduce the appearance of the seams and provide the best overall appearance.
When using vertical panels instead of traditional horizontal panels, installation of horizontal furring strips may be required. You will want to install j-channel at the top and bottom of the wall using a chalk line to ensure level. To create a balanced appearance with vertical siding, make sure the first and last pieces on the wall will be the same dimension, similar to installing flooring.
#7: Finishing at Tops of Walls and Gables
Any soffit accessories that will be used on the eaves must be installed before the final course of insulated vinyl siding can go up.
To install around gable ends, make a pattern that duplicates the slope of the gable by holding a short piece of siding against the j-channel at the slope Mark the slope with a pencil on the short piece of siding. Cut along the pencil line as a pattern, which you can use to cut the actual insulated vinyl siding panels to be installed.
If it is necessary to fasten the last panel at the gable peak, use a 1-¼” to 1-½” trim nail. This should be one of the few times a nail should be used on the face of vinyl siding.
The last piece of siding at the top of the wall may need to be cut horizontally. Typically insulated vinyl siding can be thick enough to secure tightly into the j-channel, but utility trim can be used inside the larger j-channel for a tighter fit if necessary.
#8: Soffit Installation if Applicable
Soffit is used to enclose the underside of an eave. If you are replacing the soffit on a remodel, or installing on a new home, begin by installing receiving channels, such as soffit receiver, j-channel, or f-channel.
There are many configurations for soffit and receivers; you will want to determine which method is right for your particular application. We recommend checking out pages 33-37 of the Vinyl Siding Institute’s installation guide for specifics for your job.
#9: Install Shutters and Other Accents
When installing shutters or other accents, pre-drill holes through the shutters for attachment screws, then hold the shutter up to the desired location and mark it on the siding. Use a drill to make expansion holes in the siding where the attachment screws will be located, a minimum of ¼” larger than the diameter of the screw being used. Do not fasten the shutter such that it is tight against the siding, otherwise, the expansion of the siding will be restricted.
Final Thoughts
If you are familiar with installation of traditional hollow vinyl siding, there are only a few added steps for installing insulated vinyl siding. Be sure to use all the recommended accessories to accommodate the additional thickness of the insulation, and take care when trimming out windows and doors.
Full more detailed instructions, refer to the Vinyl Siding Institute’s installation manual here>
You can also use our Preferred Contractor locator to find a qualified, experienced installer of insulated vinyl siding in your area.

Other Related Topics
Pros Who Know:
Trimming a Window
Is Insulated Vinyl Siding Right for You?

Is insulated vinyl siding right for you? If you’re considering new siding, you’re preparing to make a big investment in your home that most people make only once or twice in a lifetime. New siding can dramatically improve the appearance of your home’s exterior and make you feel like you have a new house at the same address.
Buying siding nowadays can be similar to buying a telephone. Back in the day, when you purchased a phone it did one thing: allowed you to make phone calls when you plugged it into the wall. Now most phones are mobile, can call, text, be a camera, a GPS for directions, and so much more.
Since people typically only buy siding once in a lifetime, they’re generally only focused on improving the appearance of their home, and don’t realize all the other benefits that advanced materials can provide. It is important to do the job right the first time and select the siding that will bring the most value for your investment.
Here are our eight signs that insulated vinyl siding may be the right siding for your home exterior project.
Sign #1: You Have High Utility Bills
Many people struggle with which energy-efficient upgrades will provide the most energy savings for the investment, but it’s a no brainer that adding insulation can help reduce utility bills. Did you know that 35% of energy loss in a home is through the walls? This is compared to 25% through the roof, 15% through foundation, 15% through doors, and only 10% through windows.
The side walls of your home take up the most surface area. Although most homes built after the 1970’s have fiberglass insulation in the cavity, the insulating value has likely been compromised. This is because 25% of the wall surface is made of wooden studs that are not insulated - that’s like having one entire wall of your home with zero insulation. Cavity insulation can also settle over time.
The trick is to add insulation to the outside of the home so the studs are covered in a blanket of insulation, but most homes built in the 1990’s and before don’t have any insulation on the exterior at all. The U.S. Department of Energy says “when new siding is to be installed, it’s a good idea to consider adding thermal insulation under new siding.”
By using insulated vinyl siding, you can wrap your home in an energy-saving blanket of insulation which will reduce your energy loss and help lower your heating and cooling bills, putting more money in your pocket and helping pay back your investment. See the video below on how to minimize energy leaks in your home.
Sign #2: Your House Is Uncomfortable
Not only can adding insulation help reduce your utility bills, but by doing so it also makes your home more comfortable. Do you have a bedroom of your house that is too warm to enjoy during the summer months? Is there one corner that feels particularly cold and drafty in the winter? If your home is under insulated, it can make your home uncomfortable, forcing you to turn up the air conditioning or add layers of clothing.
Insulated vinyl siding reduce your utility bills as we mentioned in sign #1, but it can also make your home environment more enjoyable. Insulated Vinyl Siding wraps your whole home in a blanket of insulation, helping to keep heat where it belongs: inside in the winter and outside in the summer.
Sign #3: Noticeable Damage to Your Current Siding
The primary goal of new siding is to make your home look fabulous, but many siding products aren’t designed with protecting your home in mind. In fact, some products like traditional vinyl siding can create a hollow gap between the siding and your home, leaving it susceptible to impact damage.
Are there any spots on your home where your siding is cracked, dented, or chipped?
Common areas for damage are at the base of the wall (such as from rocks thrown from lawnmowers) or at the corners of the home. Hail, the neighbor’s baseball, and other objects can leave your home susceptible to damage.
Insulated vinyl siding features contoured insulation that is custom shaped to fit the exact profile of the siding. The insulation acts as a shock absorber, taking the impact then returning to shape, protecting the siding during the blow.
Sign #4: Moisture Management is a Concern
Speaking of damage, if your home has ever experienced damage from moisture, you know how devastating it can be. Insulated vinyl siding helps add an extra layer of protection against bulk water from the outside which can infiltrate the siding system. In fact, an independent study by the NAHB Research Center proved that because insulated vinyl siding helps keep the wall warmer, it helps dry out the wall system faster than other wall assemblies. More>
In addition to bulk water, did you know the average family of four generates 4-6 gallons of water vapor inside a home daily? This comes from activities like cooking, showering, ironing clothes, and even just breathing! Installing insulation helps tighten up a home to reduce energy loss, but it’s important to make sure the water vapor generated inside is still able to escape through the walls.
Insulated vinyl siding features a perm rating of 3.5, making it over three times more breathable than traditional insulation products that are installed with new siding. If you live in a wet climate or have seen signs of moisture problems on your home such as mold development on the siding, then insulated vinyl siding could be right for you.
Sign #5: Problems with Pests
It can be very distressing when termites or other pests begin to infiltrate your home from the outside in. Not only can pests like termites cause serious structural damage to your home, but others such as bees or wasps can threaten the health of your family.
The insulation in insulated vinyl siding is treated with a mild insecticide which protects the foam from termite damage. When they try to take a bite out of the insulation, they’re killed. By covering your home in insulated vinyl siding, you’re adding another layer of protection against termites. And you can rest easy knowing that the insecticide in insulated vinyl siding is completely safe for your family and pets; in fact, it is used in much higher concentrations in dog and cat flea and tick collars.
The contoured foam in insulated vinyl siding completely fills the gap behind the siding, eliminating space for other pests to nest, such as bees, snakes, and birds. With traditional vinyl siding jobs, the corners create a particularly large gap between the siding and the wall. Insulated vinyl siding is installed with insulated corner posts which fill these gaps and help protect your home from all sorts of pests.
Sign #6: Outside Noise is Too Loud
Do you live near a busy roadway? Does your neighbor start up his lawnmower too early on a Saturday? Do you have a new baby that struggles to stay asleep? If any of these things are true for you, then noise pollution may be a problem in your home. Noise can be considered a pollutant when it interferes with normal activities or is unwanted in the home.
Adding a blanket of foam insulation around your home can help cut down on outdoor sounds that infiltrate your home, making for a more enjoyable environment. For example, take two foam coffee cups and place them over your ears. You will see a noticeable difference in the amount of sound that is received, and it is only a thin piece of foam. Now imagine how much sound transmission can be reduced when your home is wrapped in a 1-½” thick piece of insulation. Listen to what these homeowners have to say about how insulated siding reduced outside sounds in their home.
Sign #7: Wavy Wall Syndrome
Over time, most homes will settle, causing the walls to shift somewhat. Although this doesn’t typically cause a structural problem, it can cause your exterior walls to bow or be slightly concave. If the wall surface is not perfect when new siding is installed, some products will follow the curvature of the wall, creating an imperfect appearance.
When you invest in new siding, you want it to look good for a long time to come, not instantly imperfect. Insulated vinyl siding features a thick piece of foam insulation which helps cushion the siding and level out the wall, reducing the appearance of wavy wall syndrome.
Sign #8: You Want More Free Time Back
These days many of us are too busy to worry about time-consuming, tedious maintenance of our home. Time at home can be so limited, would you rather spend it doing maintenance or relaxing?
Siding such as wood, cedar shake, and fiber cement can require routine maintenance such as caulking, scraping, repainting or staining. Even if it looks perfect when it’s first installed, regular maintenance will be required to keep up the appearance and ensure the siding continues to protect your home from the elements. For some products, you can even void the warranty if you don’t regularly patch dents, chips, or cracks.
The siding you choose should not eat into your leisure time and take away from other activities, such as spending time with your family. Insulated siding is made from contoured insulation permanently adhered to vinyl siding. Unlike other products, vinyl never needs to be painted or caulked, and can be easily cleaned with mild soap and water from a garden hose when necessary. And because insulated siding significantly improves impact resistance (see sign #3), you won’t need to worry about replacing panels that have been damaged by your family or mother nature.
Final Thoughts
Just like purchasing a phone that provides many benefits beyond making calls, insulated vinyl siding has a lot of features beyond improving the appearance of your home. If any of these signs apply to you, we encourage you to visit our contractor locator to find a professional in your area that can further discuss which benefits of insulated vinyl siding are most valuable to you. Contractor Locator>
For Contractors: Why Insulated Vinyl Siding is Right For You
We know you take pride in your work. Your name is on every house, and your livelihood and ability to provide for your family is dependant on a quality job-well-done. If you want to bring more value to your customers and set yourself apart from inexperienced remodelers that cut corners and put your customer’s homes in jeopardy, then insulated vinyl siding may be right for you. Check out our distributor locator to see where you can get more insulation about insulated vinyl siding >
Other Related Topics
Pros Who Know:
Trimming a Window
Top Insulated Vinyl Siding Brands

We invented insulated vinyl siding at PFT over 20 years ago, and have partnered with all the major vinyl siding manufacturers to create many variations of insulated vinyl siding. With so many brands of insulated vinyl siding available on the market these days, it can be difficult to determine which products are best for your project. We are frequently asked which options are the best, and what the differences are between them. To help make the decision process easier, we’ve listed the top insulated vinyl siding brands below.
Insulated vinyl siding is traditional vinyl siding with a contoured foam insulation permanently adhered to the back. This provides benefits such as energy savings, a more durable home exterior, a quieter and more comfortable interior, and more. For more information check out What Is Insulated Vinyl Siding: Materials, Pros, Cons, and Installation>
Most Popular Insulated Vinyl Siding Brands on the Market Today: (In alphabetical order)
Craneboard Solid Core Siding
Manufacturer: Exterior Portfolio
Profiles: Double 6, Double 7, Board & Batten
What We Like:
The insulation in CraneBoard is manufactured differently than the contoured insulation paired with most other vinyl siding products; it is shape molded, which allows the foam to feature built-in drainage grooves and improved strength. Craneboard is also made with Neopor insulation, which provides more r-value than comparable insulation made of standard white EPS. (More info on Neopor here>). Finally, the Exclusive TXL Lamination Technology provides greater surface adhesion between the foam and the siding.
CedarBoards Insulated Siding
Manufacturer: Certainteed
Profiles: Double 4”, Double 6”, Single 7”, Double 4.5” Dutch, 12” Board and Batten
What We Like:
CedarBoards Single 7 and Double 6 profiles are available in longer lengths of 16’8”. This creates fewer seams when installed on the wall for a more premium look. Panels are made from .044” thick vinyl and feature a TrueTexture rough cedar finish, which is molded from real cedar boards. A ¾” panel projection helps create a more dramatic shadow line and a like-real-wood appearance.
CedarMax Insulated Siding
Manufacturer: Provia
Profiles: Single 7, Double 6”, Triple 4”, 8” Board & Batten
What We Like:
Cedarmax features a high wind load test of up to 227 miles per hour to help stand up to Mother Nature’s toughest conditions. Longer 16’-2.5” panels lengths are standard across the product line, and they offer up to 30 colors depending on profile.
ComfortClad Insulated Siding
Manufacturer: RMC StyleCrest
Profiles: Double 4.5" Dutch, Double 6", Board & Batten
What We Like:
Comfort Clad by Stylecrest features a double staggered nail hem for better protection against high winds. The panels Tuff-Lock system also helps lock each panel together firmly for superior integrity.
Haven Insulated Siding
Manufacturer: Royal Building Products
Profiles: Double 6”, Double 7”, Double 4.5” Dutch
What We Like:
Traditional, Premium, and Dark color options allow you to customize the look of your home with striking color palettes. The dedicated Designer Trim package was accurately proportioned by professional designers to accent the traditional clapboard appearance.
Prodigy Insulated Siding
Manufacturer: Alside
Profiles: Double 6”, Double 7”, Double 5” Dutch
What We Like:
Prodigy Insulated Siding features 1-½” contoured insulation, the thickest on the market today to provide one of the highest energy savings ratings. Unlike other insulated vinyl siding, it is made with a stack lock design, which insures a perfect installation and seals the panel together to help lock out air and moisture. Extended length 16’8” panels for fewer seams on the wall are standard.
Structure Home Insulation System
Manufacturer: Mastic by Plygem
Profiles: Double 4”, Double 6”, Single 7”, Double 4.5 Dutch
What We Like:
Structure Home Insulation System comes in 16’ longer lengths for fewer seams and features a ¾” butt height for a more realistic shadow line. The patented T3-LOK tightens the lock under pressure, so siding stays put even in challenging weather. Structure is also made with a minimum of 50% recycled content.
Honorable Mention
There are many other brands of insulated vinyl siding available on the market today, although they might not be as well known. Follow the links below to learn more about these brands, which offer their own unique features and benefits.
American Essence - Manufactured by Napco
Climaforce - Manufactured by Variform
InsulPlank II - Manufactured by Mitten
Polar Wall Plus - Manufactured by Norandex
Sovereign Select - Manufactured by Revere
Sequoia Select - Manufactured by Gentek
Timbercrest - Manufactured by Kaycan
What Do Insulated Vinyl Siding Brands Have In Common?
All brands of insulated vinyl siding have a few things in common. First, they are each made of three primary components:
-
Vinyl Siding
A virtually maintenance-free home exterior product, available in thousands of configurations with varying profiles, shapes, and colors. Vinyl siding is the most popular siding choice on the market today, making up 39% of all siding sales in 2013.
- Foam Insulation
Rigid insulation is custom manufactured to fit the exact shape of the siding it is paired with. This helps improve the impact resistance of the siding, providing more stability over time while also insulating the home. As the inventors of insulated vinyl siding, we manufacture the insulation for all the major vinyl manufacturers, and connect our two products using the third component: - High-Strength Adhesive
This product helps form a permanent bond between the vinyl siding and the foam. Extensive laboratory testing and real-life installations on over half a million houses during the past 20 years have proven the strength of this permanent bond.
How to Decide Which Brand of Insulated Vinyl Siding is Right For You?
Every home is different, and the features and benefits of the insulated vinyl siding required for your project can vary drastically. A few things that can impact which brand is best for you are:
- Location - Some brands are only available in certain areas of the United States or Canada.
- Your Design Preferences - Certain profiles, colors, and styles of insulated vinyl siding are only available in certain areas of the country, or are only produced by certain manufacturers.
- Features & Benefits - Depending on which benefits are most important to your project, you may be guided to different brands of insulated vinyl siding. Some feature higher r-values for more energy savings, some feature built-in moisture management systems to protect from mold and mildew damage, and much more. Determine which features are most important to help narrow your selection.
- Price - As with any product, the design, features, and benefits selected can significantly change the price of the siding. Premium colors, profiles, accessories, and installation methods can all impact the price. For more information check out the Insulated Vinyl Siding Price Guide>
When shopping for insulated vinyl siding, it’s a good idea to visit the manufacturer’s websites and consult with a trade professional who can make a recommendation based on your specific needs. Once you know which brand of insulated vinyl siding is the best fit for your needs, you will want to select a contractor that carries that particular product line.
Other Related Topics
Pros Who Know:
Trimming a Window
Definition of Insulated Vinyl Siding (in Under 100 Words)

Insulated vinyl siding ˈɪnsəˌleɪtəd ˈvaɪnəl ˈsaɪdɪŋ
Noun: Vinyl siding with contoured, rigid insulation permanently adhered to the back
Insulated vinyl siding is contoured rigid foam permanently adhered to vinyl siding. Insulated vinyl siding benefits include energy savings, low maintenance, and many design options.
Expanded polystyrene (EPS) rigid insulation is contoured to fit the custom shape of vinyl siding. The insulation is permanently adhered to the siding panel during the manufacturing process.
Insulated vinyl siding costs anywhere from $4.00 - $12.00 per square foot installed. Depending on the options chosen, some projects may fall outside this range.
Definition of Closed Cell Foam (in Under 100 Words)

Closed cell foam is made of uniform cells that maintain their shape. Because the cells have their own cell walls, they are rigid and trap a large amount of air. This makes for more sturdy insulation products.
Closed cell foam differs from open cell foam, which is made of irregularly shaped cells that are linked together. Because the cell walls are broken, the foam is softer, making great sound dampening products, furniture, and sponges.
Most insulation products used in remodeling and construction are closed cell, because they trap air for greater insulation value, and do not easily absorb moisture
PFT Installation Expert Jared shows our hot box demo tool, and a few tips on how to use it. The hot box dramatically shows energy efficiency versus energy wasting.
Inside the hot box is a red heat lamp. The left side has a piece of traditional fiber cement siding. The right side has insulated vinyl siding. Once the box heats up, you can place your hand on each piece of siding. On the left, you will feel the heat radiating through the panel. The right side, with insulated siding, is much cooler to the touch.
Using a temperature gun, you can also take accurate readings of each side. You will notice the side with insulated siding has a much lower reading, usually around 30 degrees lower.
This thermal image also shows how dramatically the insulated siding slows down the transfer of heat compared to the other siding panel.